
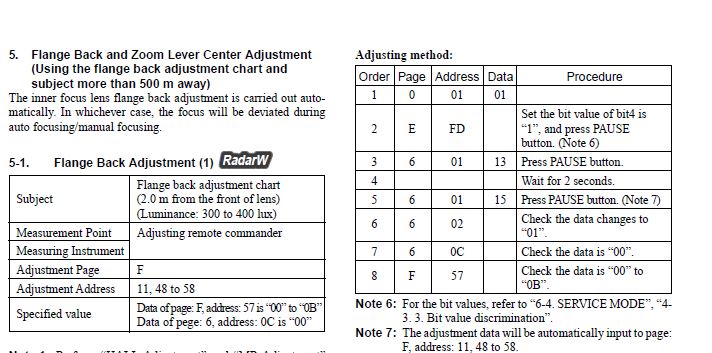
Adjusting method:
Order Page Address Data Procedure
1 0 01 01
2 E FD
Set the bit value of bit4 is
“1”, and press PAUSE
button. (Note 6)
3 6 01 13 Press PAUSE button.
4 Wait for 2 seconds.
5 6 01 15 Press PAUSE button. (Note 7)
6 6 02 Check the data changes to
“01”.
7 6 0C Check the data is “00”.
8 F 57 Check the data is “00” to
“0B”.
Note 6: For the bit values, refer to “6-4. SERVICE MODE”, “4-
3. 3. Bit value discrimination”.
Note 7: The adjustment data will be automatically input to page:
F, address: 11, 48 to 58.
I've done lots of flange back adjustments on other Sony camcorder models but, on this one, when I went to instruction 2, page E, address FD, the data was 40, so I change that to 39 (giving a bit4 value of '1' ) and pressed the PAUSE button (to write to the registry), and carried on with the other instructions. As soon as I changed page E, address FD, data to 39 the screen of the camcorder went black and stayed like that throughout the other instructions. As nothing seemed to happen, I went back to page E, address FD, and changed the data back to 40 and pressed the PAUSE button, to write to the registry. The camcorder seemed to start running through its automatic flange back adjustment, but then seemed to be bricked, with error E:60:00 displayed and the focus lens vibrating rapidly back and forth at a high frequency, giving a very blurred image. On disconnecting the adjustment commander, the camera would display no image, when turned on, just a blue screen. After 90 minutes of writing correct values to the registry, the camera went through its correct automatic flange back adjustment, and all was well.
I then tried to do the flange back adjustment on another DCR-HC39E, and just missed out instruction 2 and that worked fine and made correct adjustments. Is the service manual incorrect, or am I missing something?